�P�D�~�̊�{ |
||||||||||||||||||||||||||||||||||||||||||||||||||||||||||||||||||||||||||||||||||||||||||||||||||||||||||||||||||||||||||||||||
| �~�̈�ʓI�Ȍ����� �ł����A �~�b�`�F�i�[(Michener)�̃A���S���Y���ł� �̏�Ԃɂ��Ďg���܂��B �s�^�S���X���ēV�˂��ȁ`�Ǝv���������̍��B |
||||||||||||||||||||||||||||||||||||||||||||||||||||||||||||||||||||||||||||||||||||||||||||||||||||||||||||||||||||||||||||||||
�Q�D�f�W�^���~�̕`����s���O�� |
||||||||||||||||||||||||||||||||||||||||||||||||||||||||||||||||||||||||||||||||||||||||||||||||||||||||||||||||||||||||||||||||
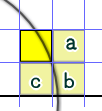
| �ŏ��Ɍ����Ă����܂��� �f�W�^���~�̓A�X�y�N�g��̊W��A�^�~�ɂ͋߂Â��܂���B�ǂ��������Ă��B �s�N�Z�����̂��c���Ȃ̂ʼn~��������Əc���ł��B �A�X�y�N�g��̏C���͊e�A�v���P�[�V�����ōs���ق��������̂ŁA �����R * R �s�N�Z���̐����`�ƍl���ăA���S���Y����g�݂܂��B ���������������B |
||||||||||||||||||||||||||||||||||||||||||||||||||||||||||||||||||||||||||||||||||||||||||||||||||||||||||||||||||||||||||||||||
�R�D���낢��ȃf�W�^���~�̕`�� |
||||||||||||||||||||||||||||||||||||||||||||||||||||||||||||||||||||||||||||||||||||||||||||||||||||||||||||||||||||||||||||||||
| �f�W�^���~�̕`��̃A���S���Y���͂Q�A�R��ނ�����܂��B �u���[���n��(Bresenham)�A�~�b�`�F�i�[(Michener)����ʓI�ł��B OpenFMI�Ƃ����T�C�g�̒��̃y�[�W�� "Comparing Circle Drawing Algorithms"�Ƃ��� C �̃\�[�X http://openfmi.net/snippet/detail.php?type=snippet&id=8 ���Љ��Ă��܂��B ����R�[�h���Ƀu���[���n���A�~�b�`�F�i�[���̊����p�ӂ���Ă���A�\�[�X�Ƃ��Ă͊����ł��B ���Ȃ݂ɂ��̃\�[�X�̒��Ƀ_�u���E�T�u�X�g���N�V�����i�Q�d���Z�j�Ƃ����A���S���Y��������܂����A ����́A�u���[���n���̒��_��p�����~�`��̂悤�ł��B �i"second-order differences"��"midpoint circle algorithm"�Ƃ��������O�ŗm�T�C�g��������Ƌg�ł��B�j |
||||||||||||||||||||||||||||||||||||||||||||||||||||||||||||||||||||||||||||||||||||||||||||||||||||||||||||||||||||||||||||||||
�S�D��{�I�ȃf�W�^���~�̕`��̍l���� |
||||||||||||||||||||||||||||||||||||||||||||||||||||||||||||||||||||||||||||||||||||||||||||||||||||||||||||||||||||||||||||||||
|
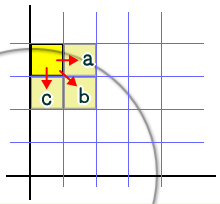
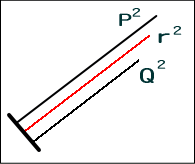
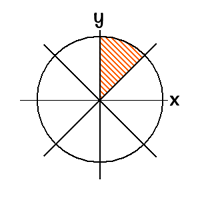
���ꂪ�l�����̊�{�ł��B �����z���g�ɖ���Q�悵�Ĕ�r���Ă��獂�����Z�ɂȂ�Ȃ��̂Ŋe�A���S���Y���ōH�v���Ȃ���Ă��܂��B |
||||||||||||||||||||||||||||||||||||||||||||||||||||||||||||||||||||||||||||||||||||||||||||||||||||||||||||||||||||||||||||||||
�T�D���ł̃u���[���n��(Bresenham)�̉~�`�� |
||||||||||||||||||||||||||||||||||||||||||||||||||||||||||||||||||||||||||||||||||||||||||||||||||||||||||||||||||||||||||||||||
|
||||||||||||||||||||||||||||||||||||||||||||||||||||||||||||||||||||||||||||||||||||||||||||||||||||||||||||||||||||||||||||||||
|
||||||||||||||||||||||||||||||||||||||||||||||||||||||||||||||||||||||||||||||||||||||||||||||||||||||||||||||||||||||||||||||||
�U�D�~�b�`�F�i�[(Michener)�̉~�`�� |
||||||||||||||||||||||||||||||||||||||||||||||||||||||||||||||||||||||||||||||||||||||||||||||||||||||||||||||||||||||||||||||||
| �C�O�̃T�C�g�ł͂��́u�~�b�`�F�i�[�v�̃A���S���Y�����u�u���[���n���v�Ƃ��ďЉ�Ă���Ƃ��낪����܂��B �M�҂��u�M���̂ł��镶���v�������ĂȂ��̂ŏڍׂ͕s���ł��B �d���������̂ŁA�Ƃ肠���������́u�~�b�`�F�i�[�v�Œʂ��܂��B
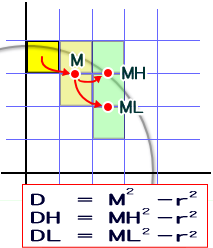
������DH�ADL�̂��ꂼ���D�Ƃ̍������l���܂��B DH = D + �` DL = D + �` �Ƃ���Ή��Z�������ɂȂ邩��ł��B DH - D = 4x +6 DL - D = 4x - 4y +10
D�������l�́A�X�^�[�g�n�_��(0, r) �Ȃ̂�
���A D0 = a+b = 2T + 4x - 2y +3 = 0 + 4*0 -2*r +3 = 3 -2*r �ł��B |
||||||||||||||||||||||||||||||||||||||||||||||||||||||||||||||||||||||||||||||||||||||||||||||||||||||||||||||||||||||||||||||||
|
||||||||||||||||||||||||||||||||||||||||||||||||||||||||||||||||||||||||||||||||||||||||||||||||||||||||||||||||||||||||||||||||
�V�D�u���[���n��(Bresenham)�̒��_�����p�����~�`�� |
||||||||||||||||||||||||||||||||||||||||||||||||||||||||||||||||||||||||||||||||||||||||||||||||||||||||||||||||||||||||||||||||
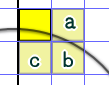
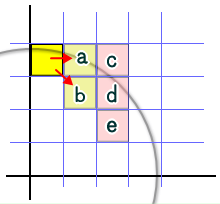
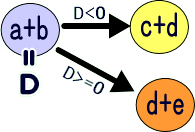
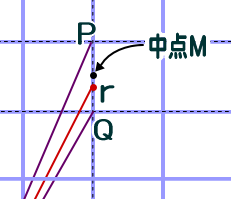
D <0 �Ȃ�AM<r �� r ���^��(==M)����� ���ʒu�ɂ���̂ŁAP�_��I���A D >=0 �Ȃ� M>=<r �� r ���^��(= =M)����Ⴂ�ʒu�ɂ���̂ŁAQ�_��I�����܂�
���̂ւ�̂����̓~�b�`�F�i�[�Ɠ����ł��B D�������l�́A�X�^�[�g�n�_��(0, r) �Ȃ̂�
���A D0 = T +2x -y +1+/4 = 0 + 2*0 -r +1+1/4 = 1 -r +1/4 �ł��B ���[�`����Ax, y, r �͑S�Đ����ŁA ��r���Z�A������Z�ɂ����Ă��S�Đ����ŊԂɍ����Ă��� �����l D0 �̏��������ł��� 1/4 �͌��ʂɂ܂������e�����Ȃ��̂ŁA 1/4 �͐�̂ĂĂ��܂��܂��B ���������� �����l D0 �� D0 = 1 -r |
||||||||||||||||||||||||||||||||||||||||||||||||||||||||||||||||||||||||||||||||||||||||||||||||||||||||||||||||||||||||||||||||
���Ă���ňꉞ���C�����[�v�̊����ł��B
|
||||||||||||||||||||||||||||||||||||||||||||||||||||||||||||||||||||||||||||||||||||||||||||||||||||||||||||||||||||||||||||||||
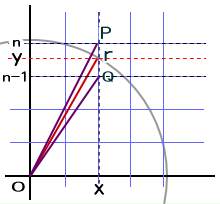
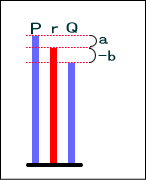
���x��D �̑����ɒ��ڂł��B
���ꂼ��̑�������dh�A��dl �Ƃ���� ��dh = 2x +3 ��dl = 2x -2y +5
��dh �� x ���P������� 2�����܂��By �̑����͊W���܂���B ��dh = 2(x+1) +3�@// �E�E�Ex ���P�������Ƃ� ��dl �� x ���P������� 2�����܂��By ���P�����Ă� 2�����܂��B ��dl = 2(x+1) -2(y-1) +5�@// �E�E�Ex ���P�����āAy ��1�������Ƃ� = 2x +2 -2y +2 +5 = 2x -2y +9 �܂��A��dh�A��dl ���ꂼ��������l�́A�X�^�[�g�n�_(0, r) ���A ��dh = 2x +3 = 3 ��dl = 2x -2y +5 = 5 -2r |
||||||||||||||||||||||||||||||||||||||||||||||||||||||||||||||||||||||||||||||||||||||||||||||||||||||||||||||||||||||||||||||||
�������C�����[�v�̊����ł��B
|
||||||||||||||||||||||||||||||||||||||||||||||||||||||||||||||||||||||||||||||||||||||||||||||||||||||||||||||||||||||||||||||||
�Ŏ��ۂ̊�������B
|
||||||||||||||||||||||||||||||||||||||||||||||||||||||||||||||||||||||||||||||||||||||||||||||||||||||||||||||||||||||||||||||||
�W�D�܂Ƃ� |
||||||||||||||||||||||||||||||||||||||||||||||||||||||||||||||||||||||||||||||||||||||||||||||||||||||||||||||||||||||||||||||||
����̓A���S���Y���̏Љ���ŏI���܂����A ���͏�L�̃u���[���n�� �ƃ~�b�`�F�i�[�A���͏�����肪����܂��B �P�D�����ɔ��a���w�肵�Ă���̂ŁA��̒��a���w��o���Ȃ��B �@�@�@�@�傫�ȉ~�Ȃ炩�܂�Ȃ��̂ł����A�f�W�^���~�͏����ȉ~�̏ꍇ�����Ȃ��Ȃ��̂ŁB �Q�D���͐��x���ǂ��Ȃ��B �@�@�@�@�A���S���Y���̌�������́u�����v�Ȃ�ł����A���ۂ������
�����͎���B |
||||||||||||||||||||||||||||||||||||||||||||||||||||||||||||||||||||||||||||||||||||||||||||||||||||||||||||||||||||||||||||||||
|
||||||||||||||||||||||||||||||||||||||||||||||||||||||||||||||||||||||||||||||||||||||||||||||||||||||||||||||||||||||||||||||||
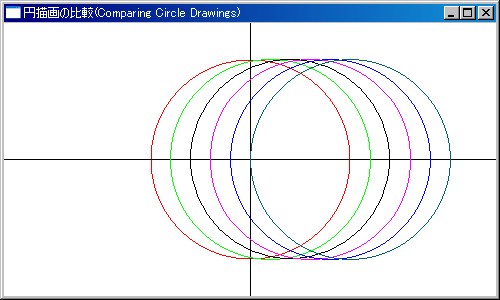
| ���L�T���v���� "gt_img_09.cpp" �t�@ �C���P�����ł��B �P���ɉ~�`��A���S���Y�����r���邽�߂̃\�[�X�ł��B OpenFMI�Ƃ����T�C�g��"Comparing Circle Drawing Algorithms"�Ƃ��� C �̃\�[�X�� �Q�l�ɂ��Ă��܂��B ���{����A�C�����āA����ɃE�`�̃I���W�i�����������Ă��܂��B ����� �P�DReallySimpleCircle() �̓V���v���~�`��(�����؎̂�)�ł��B �Q�DReallySimpleCircle2() �̓V���v���~�`��(�l�̂��߂��s�N�Z����I���������) �R�DWin32APIGDICircle() Win32API GDI �~�`�� �S�DBresenhamCircle() �̓u���[���n��(Bresenham)�̉~�`�� �i���Łj �T�DMiechenerCircle() �̓~�b�`�F�i�[(Miechener) �̉~�`�� �U�DMidpointCircle() �̓u���[���n��(Bresenham)�̒��_����̉~�`�� �U�̊��̂��� �P�DReallySimpleCircle() �V���v���~�`��(�����؎̂�) �T�DMiechenerCircle()�@�@�~�b�`�F�i�[ �U�DMidpointCircle()�@�@�@�@�u���[���n��(���_) �̂R�̊�������~��`���܂��B �~�b�`�F�i�[��u���[���n�����Ȃ��A�����؎̂��̃V���v���~�ɂȂ�̂��M�҂ɂ͂킩��܂���B �Q�DReallySimpleCircle2() �͓��T�C�g�E�I���W�i�����ł��B ��{�ɒ����Ȃ̂ŁA����菭���������x��������ł����A���s���x�̒x�����ł��B |
||||||||||||||||||||||||||||||||||||||||||||||||||||||||||||||||||||||||||||||||||||||||||||||||||||||||||||||||||||||||||||||||